Readers' Choice


Popular articles
With this article, Master Gumbs, I begin a series of materials about climbing glands.
It’s not enough to climb a mountain or a building. You still have to get down from there. It is often much more convenient to use a descender than to try to retrace your steps, slipping and balancing. And in industrial mountaineering, in most cases, one gets to the workplace using the descent method. Descending at knots is not always convenient. And hardware offers a much larger number of use cases.
So - "eight"
.
One of the most common trigger devices, which traces its origins back to the legendary Sticht washer. Naturally, it has a bunch of options. The operating principle is based on increasing friction. Thus, the classic figure eight increases the force on the rope by 4-20 times. For example, if you hold a rope with your hands in front of the figure eight with a force of 25 kg, then behind the figure eight the force will be 200 kg, with a hand grip force of 50 kg - 300 kg.
Due to the large number of kinks, a common disadvantage of all figure eights is that they twist the rope. This can be somewhat mitigated by preventing the rope from touching the ground.
Two-horned, horned
Classic and specialized ("Pirana" from "Petzel")
Horned eight (invar, puck)

Blocked eight. In an unloaded state, it is slightly shifted towards the working hand, but if there was someone in the harness, it would become straight.
To descend, you need to take the free end (which goes down) in your hand and, pulling slightly, begin to remove the coils from the horns. When you feel that you are starting to creep down, it means everything is going as it should.
For a hundred kg of load, it is better to leave one turn on the horns. If a person weighs 60 kilos, then you can safely throw everything away. Naturally, not forgetting about holding the end.

And a correctly blocked eight)
But few people do this.
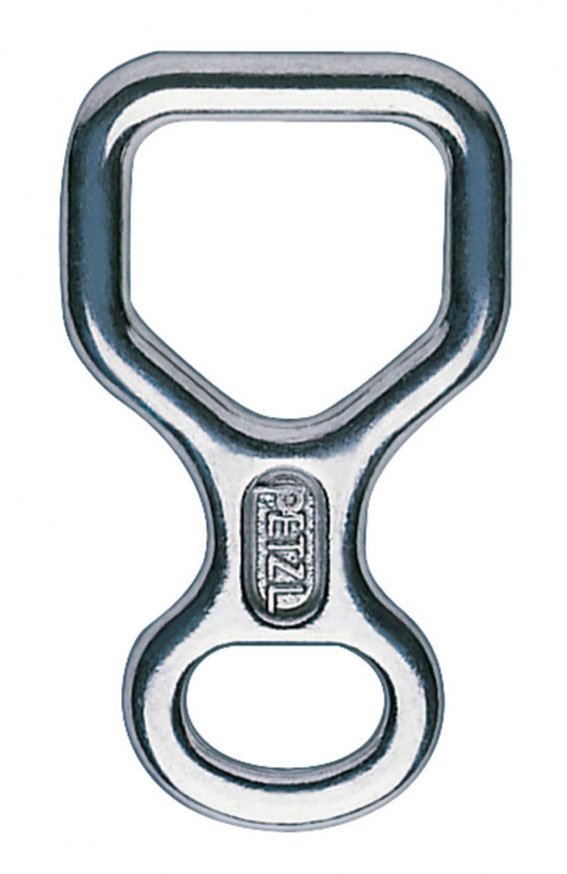
As a rule, this is a metal product that repeats the shape of the number “eight”. The two rings are inextricably linked to each other, one is at least one and a half times smaller than the other. On one side there are two protrusions in the form of horns, designed for blocking by wrapping with a rope, up to 5 turns (turns). You can try more, but it won’t fit))). For additional blocking, the free end can be passed between a figure eight and a stretched part of the rope.
It is used in mountaineering, industrial climbing and organizing show-offs. Used for descent, and in mountaineering/climbing, also for belaying
For mountaineering, aluminum ones are most often used, while steel ones are more often used in industrial climbing.
In the first case - to reduce wearable weight, in the second - for durability. After 50-60 descents on a contaminated rope, the duralumin “eight” is used up by about a third, becoming completely unusable.
Steel, on the other hand, lives for two or three seasons, and for Moldavian-Central Asian brigades - up to ten

Rope threading options. On the left is an option for lightweights. On the right - for good people, of whom there should be many.
I think that the relationship between the refueling method and the weight of the descending body is noticeable. For warrant officers I suggest:
The rope passing through the carabiner and figure eight has fewer kinks and, accordingly, creates less friction. Less friction means faster descent speed. It's simple.

With this option, the rope passes from the other side. No special changes occur. It's a matter of habit, nothing more. Personally, I find the right one more comfortable.

There is also a refueling option. Also, it doesn’t change anything.
Despite the fact that the origin of the name is clear from the design itself, I once heard a version that the figure eight got its name due to the fact that with additional blocking, the turns on the horns cross.
Classic eight (hornless)
It is used in mountaineering and rock climbing to organize descent. It is not intended for hanging, because there is nothing to block the rope. Maybe just attach another carabiner and throw fire through it. well, or winding clever knots.
During factory production it is made of aluminum alloys.

On the left is the position for an uncontrolled descent :)
On the right is the working position. The lower end, like all eights, must be controlled by hand when descending.
Specialized eights.
There are a huge number of options in the world, developed for a wide variety of specializations. Unfortunately, I only have the Pecelev Pirana on hand without the corresponding carbine, so a detailed story will not work.
To be continued
Original taken from mr_aug V
Original taken from survivalpanda in Vertical training for beginners. Educational program. Entry-level theory and practice
In this article I will try, to the best of my understanding, to explain the basics of mountain training as simply as possible for absolute beginners in the topic.
I’ll tell you about the terms and simple techniques of descent and ascent that anyone can master.
Just a few months ago, I had to surf the Internet for quite a long time to collect this information, so I decided to systematize and present it as simply as possible, I think it will be useful.
The article turned out to be long, but you can’t erase the words from the song. It took a long time to write. Right along with writing, I was testing or mastering something new and including it in the article.
I also do not rule out some mistakes that I could well have made.
Warning: it is better to do such things under the supervision of professionals. Otherwise, you can very easily get killed or injured.

So. It all started with a great bang. All mountain training, according to my classification, is divided into two types of organization of rope movement. This is an upward movement i.e. ascent and downward movement i.e. descent.
Now we will slowly begin to examine each piece of equipment and term that may come across on the thorny path of a beginner who wants to get a little familiar with this topic.
The first thing we need is rope.

Without a rope, we won’t climb anywhere and then we won’t get down from there.
There are two types of ropes used in mountaineering: static(statics - slang) and dynamic(dynamics - slang). They are distinguished by dynamic qualities, namely the ability to elongate under load.
The main property of dynamic ropes is the ability to absorb the shock that occurs when a climber falls (we will talk about the fall factor below). Therefore, dynamics are very often used for insurance when climbing. For bottom belay it is generally required.
For simple descent and ascent along a rope, a beginner will only need to purchase a static rope. A bay of 50 m is enough for everything and there will still be some left. A budget option would be to purchase domestic rope (Kolomna, Dzerzhinsk, etc.).
Standard diameters used in mountaineering are 9-11 mm (in industrial alps - 10-12). The more, the stronger and heavier the rope. The more it slows down in the trigger device.
I advise you to stay at the golden mean - 10 mm.
And if we touched the ropes, then we cannot ignore cord(repik, repchik - slang). This is an auxiliary static rope with a diameter of 3-8 mm. It has a bunch of uses, from organizing self-insurance to making laces.
In general, there was no paracord lying around.

I use a 5mm cord, a coil of which is almost always in my backpack.
Looks like we've sorted out the ropes.
From the ropes we smoothly move to the knots.
There are a lot of different knots and you can learn them endlessly. I will focus only on a few that, in my opinion, are most in demand.
Firstly this eight, one might say, is the main unit that can be used in almost any case. A very reliable knot that practically does not weaken the rope.
A figure eight is used for tying both to an individual safety system (ISS) and to a support. For connecting and extending ropes, in general for almost everything.
You need to learn how to knit a figure eight stitch.
Bowline- a very common knot for tying and creating loops. Less reliable than figure eight, but knits faster. A control node is required. Not completely reliable. Better tie a figure eight.
You need to know at least one grasping knot. Then we will use them to insure ourselves.
What a knot UIAA(UIAA), needed for emergency descents and descents with a minimum of equipment.


Note! The free end of the rope should come out from the side opposite to the carabiner coupling.

Have you bought a rope, mastered the knots, can you now climb and descend?
In principle, yes, you can rappel without any equipment, just like in the good old days.
Rappelling - rappelling. Many people think that this is any descent, but this is not so. Dulfer is a technique of descent named after the inventor.
So, it is possible to go down this way, but it is not safe and inconvenient.
For convenience and safety, they have been invented for quite some time. Personal Safety Systems(ISS, system, gazebo, suspended).
They serve to distribute the load on the body when hanging and falling and prevent you from falling.
There are systems full And waist.
I use a belt system. If desired, it can be turned into a full one by purchasing special straps.
For beginners, I would recommend a regular ASC without shoulders.
If you need a budget option, then the domestic company Vento. In any case, you should not take systems consisting only of slings. People affectionately call them “egg slicers.” If you have enough money, then it’s better not to skimp and take something from famous brands Petzl, Black Diamod, etc.
The following photo shows the main elements of the safety system:
Leg loops
Waist circumference
Safety ring (green)
Loops for hanging equipment - they are not load-bearing, and under no circumstances should you belay or hang on them.


We've sorted out the safety systems.
Now we need combine the rope with the iss. There are two ways to do this. With a knot and through a carabiner.
The knot is the same figure eight, and I’ll tell you about the carbines a little lower.
The carabiner clips into the central safety loop. This is a strong recommendation from all manufacturers.
Very often they teach how to fasten into a belt loop and a leg loop at the same time - this is a mistake because... increases the chance that the carabiner will skew and it will be loaded in the transverse direction. Only a knot can be attached to both loops at the same time.
If you don’t believe me, then read the instructions for your ISS.

Now let's move on to carbines.
So, what are there carbines.
Firstly, they are either coupled or uncoupled.
Their difference is that the clutch ones are equipped with a special clutch that prevents the carbine from opening spontaneously.
Couplings There are threaded, bayonet and automatic.
Automatic ones are easy to operate with one hand, but their reliability leaves much to be desired. I recommend using carabiners with threaded couplings. And the main thing is to always make sure that the carabiner is locked.


Also, carbines differ in shape and are: oval, trapezoidal, triangular, pear-shaped, etc.
Oval carabiners are the most versatile and inexpensive.
Trapezoidal ones with the same weight have greater strength than oval ones.
Triangular and pear-shaped carabiners have increased rope clearance. They are more convenient to fasten and use the UIAA knot.


Carabiners are made from different materials. These are steel, aluminum alloys and titanium.
Steel carabiners are heavy and very durable, aluminum carabiners are much lighter. Titanium ones are quite rare and I have not communicated with them.
Now for strength.
Each carabiner is marked like this. It means that the carabiner from the photograph in a locked state will withstand a load of 22 kN (2.2 tons) in the longitudinal direction. 8 kN if the latch is open and 8 kN in the transverse direction.

You see how important it is to couple the carabiners and make sure that they are positioned as they should.
Note! The carabiner coupling should always be facing you. This way you will see if the carabiner has accidentally become loose.
If there is a possibility that the load will be applied from several sides, so-called rapids are used. These are steel carabiners that do not have a folding latch, but only a threaded coupling.
For a beginner, I would advise buying 3-4 carabiners of different shapes with threaded couplings. Manufacturing material - optional.
Let's move on to Descenders(SU, trigger).
The main principle of operation of all control systems is the creation of rope friction in the mechanism. As a result, you can control the descent with very little effort.
There are SUs manual And automatic.
In manual control systems, the speed of descent and braking depends only on the method of threading the rope and on the force with which the person pulls the rope below the control system.
Automatic release devices have a special mechanism. Pull the handle and go down. Let go of the handle and freeze. In this case, the free end of the rope must still be controlled.
In this article I will only talk about hand-held devices because... For a beginner who does not plan to engage in industrial alpine activities, automatic devices are completely redundant.
And I’ll tell you about two types of triggers - the figure eight and the Shikht washer.
SS eight- This is one of the most classic devices. It looks something like this.

The horn is needed to fix the rope, there are eights and without horns.
The disadvantage is that the figure eight twists the rope. This means that after several descents the rope will be full of “lambs” that will then have to be untangled.
The advantages include several options for threading the rope.
There are two of them. Through the carabiner (the descent speed is higher) and through the neck of the figure eight.


Well, at any moment the horned eight can be blocked by winding a rope around the horn.

Another, more modern version of the figure eight is the Petzl piranha. Has even more ways to clip in and adjust the release speed. More details about this trigger will be in a separate review.

By the way, take a look at this carbine. When it is uncoupled, the red anodizing strip is visible - a great idea, in my opinion.

The second type of manual control system is washer charge. They are: glass, basket, reverso, etc.

Works great with single and double rope. They don't spin it. In general, I recommend starting with just such a trigger.
Threading the rope is carried out as follows. A loop is created and threaded through a slot on the device. The free end of the rope is directed towards the SU jaws.

A carabiner is attached inside the loop.
Note! The cable is a non-loadable part and is used only for transportation.
Let's say the stars align. You have purchased a coil of rope, an ASC, carabiners and a belay device.
Good, still needed helmet. But I’ll leave that up to your conscience.
Although even a banal construction helmet won’t hurt.
I use ballistic helmets, which doesn't always cause a healthy reaction.

Will not be superfluous knee pads. Otherwise, bruises on the knees cannot be avoided.
Good ones are just as important. gloves. When descending quickly, the rope rubs and burns your palm; you may instinctively let go of the rope out of pain, which can be fatal.
Now we take all this and go to an impromptu climbing wall.
Don’t forget to invite a friend with you who will provide insurance. Have you forgotten? Well done!
Our climbing wall will be a small wall from which you can climb down. In the photo, for example, a retaining wall.

For the first training, the lower the better.
Now we put on the harness. Tighten and check all buckles. We ask a friend to check again.

The first step is to secure the rope. In mountaineering, it is customary to fasten either to one absolutely reliable point, or to two less reliable ones. These rope attachment points are called stations.
We will be tied to a living tree. This is a very reliable attachment point.
We tie ourselves to the tree with the same blessed eight, or with a bowline, not forgetting the control knot.
There is another option to buy yourself guy from a 120 cm long sling and use a carabiner to create a station like this.

Using a half-grabbing knot reduces strength by 50 percent, but the "noose" ( semi-grasping knot) allows you to gain a foothold higher.
We'll do it like this.

Well, in general, such sling guy lines are very useful on the farm. You should take a couple.

The station was created. First of all, we secure ourselves to it with a lanyard. If you don’t know what it is, then you can play it safe with a replica, like I do in the photo.

And while we're on the subject, I'll say a few words about lanyard mustache.
These are pieces of sling or dynamic rope, which are attached at one end to the system and at the other to the belay point.
There are industrial production and self-connected.
The purchased ones look like this.

Self-connected like that. The mustache is attached to the system using a figure eight knot.
The first mustache, as a rule, has a standard length of 55 cm. It is mainly used for securing to surrounding objects, such as the station that we made in the previous step.

The zhumar is usually attached to the second mustache. Its length should be such that, hanging on this mustache, you can reach the latch of the zhumar (I’ll tell you what the zhumar looks like, where the latch is and what it actually is a little below).
At the free ends of the lanyards, knots are tied into which carabiners are fastened. I use a half grapevine with three turns. If you don’t know how to do this kind of knot, use a figure eight.
Now let's go back to the beginning of the "cycle". We found support. We created a station on it, clicked on the lanyard. Happened? Well done!
Now, at the end of the rope along which we will go down, we knit a figure eight and snap it into the carabiner that we hung at the station.

At the other end of the rope we also tie a knot and throw the bay into the “abyss”.
This knot ensures that even if the rope does not reach the bottom, you will simply stop and not fall by slipping past the end.
Even if you think the rope has reached the bottom, you still need to make sure. Ask a friend below.
If the rope passes through the edge of the wall and rubs against it, then you should put it on it tread. This is a strip of dense material (teza, a piece of fire hose, etc.) with Velcro. Wraps around the rope and protects against abrasion.
If you don’t put on the protector, then after a couple of times you get this picture. Agree, that’s not the point.

We thread the rope into the descender (I hope you didn’t forget it below). Pull the free end up and take up the slack.

Now, if you pull the free end of the rope, you will not be able to fall.
At this stage, you can snap the lanyard arm out of the station.

By the way, your insurance will be based on the same principle. There should be a belayer standing below, and it is advisable that this is not your worst enemy, who is already rubbing his sweaty palms in anticipation of your fall.
The belayer must be ready to pull the free end of the rope.
He should not be distracted from belaying by pretty climbers or talking on his cell phone. All his attention should be focused on you.

We place the hand with the rope under the butt, while the rope will be additionally controlled on the thigh.
We go out with our backs to the edge, slowly releasing the rope by slightly relaxing our palms.
While resting your feet, we hang the fifth point so that your legs are at right angles to the wall. The back is straight and parallel to the wall.

We make the first descent slowly, in steps. We rearrange our legs and slowly release the rope until we touch the ground.
Congratulations, the first descent is complete!
In the future, the descents can be made more difficult as desired.
You can and should move from an insuring comrade to self-insurance(and also, for maximum security, both of these options can be combined).
This is precisely why we learned the grasping knot.
The knot is usually knitted either above the SU or below. What's the difference?
If we knit a grasping knot above the suction knot, then in case of failure we hang on it. The descender becomes unloaded.
To continue the descent, we need to loosen the knot and load the descender again. In order to loosen the knot we need to rise a little. To do this, we will need a clamp (I will talk about them later) or tie a stirrup on a rope.
In general, the task is not very trivial.
A simpler option is to tie a catching knot below the tie knot. The autoblock unit is used in the photo.
In this case, during a breakdown, we remain hanging on the knot, while the trigger remains loaded.

We only need to grab the rope between the control system and the knot, thereby unloading the knot, it will be possible to loosen it and continue the descent.
It seems like a good method, but it also has drawbacks. If the reason for the failure is the destruction of the control system, then we will be turned upside down, which is very unpleasant. Although this probability is quite small, it should not be neglected.
Read more about attaching lanyards below the control system in a very sensible article:
That's it, the descent is mastered. You can not stop there, but continue training, for example, master the elements of assault mountaineering, which basically consists of spectacular descents.
Even if you stop after mastering only the basics, you have already acquired skills that can, in the event of certain circumstances, such as a fire in a stairwell, save your life.
Everything about the descent.
Now is the moment to touch upon climb along the rope, but first I’ll tell you a little about the clamps.
Clamp- a device that moves freely along the rope, but when a load occurs, the device is fixed, clamping the rope, hence the name.
To climb a rope you need two clamps or one clamp + an automatic belay device.
The most common clamp is zhumar. This is a clamp with a handle that is comfortable to hold. The most convenient tool for lifting (this is where the term zhumarit comes from, meaning to rise). It is advisable to have at least one.
Jumars can be left or right, for any hand.

The operating principle of the zhumar is quite simple. It is based on pressing the rope with a spring-loaded cam with spikes.

We put the open jumar on a rope and snap it into place. It slides upward freely along the rope, and when loaded it is fixed. It is impossible to remove a loaded jumar.


For greater security, you can click the carabiner like this.

A pedal is attached to the handle of the jumar. Still, the strongest muscles in a person are in the legs.
The pedal should be such a length that when standing in it with a fully straightened leg, the jumar is at chest level.
Let the jumar be our first clamp. The second clamp can also be a jumar, but for the left hand.
Lifting on two zhumars is done like this.
We stand on the left pedal. We push the right jumar along the rope as high as possible, while bending the right leg at the knee. We push with our right foot - “climb the step.” Then we push the left jumar, etc.
It is better to secure both jumars with a self-insurance mustache.
Instead of the second zhumar, you can (and even need) take crawl. This is a clamp that is very similar to a jumar with a sawn-off handle. He hangs himself on his chest. In case of use with a waist-mounted ASC, you must additionally hang a special rope around your neck.

The principle of lifting on a pair of jumar + crawl.
I will further demonstrate this method in a separate video.
We hang out on the crawl. We push the jumar as high as possible, bending the leg with the pedal on the knee. We pull ourselves up on the pedal. The rope itself passes through the crawl. Then we hang on the crawl and push the jumar further.
In this case, you can hold onto the jumar with both hands, and put both legs into the stirrup of the jumar.
Lifting using jumar + crawl is the fastest and easiest to learn.
There is an option to do without jumar altogether.
For example, using the crawl + pantin pattern.
Pantin- this is the same crawl, only attached to the boot. The lifting principle is similar.
But I would advise you to buy at least one zhumar. In addition to climbing, you can also insure yourself on it, although it is not recommended.
The second type of clips that I highlight are safety clips.
You climb, and the belay clip rides next to you on the second rope, or above you if there is only one rope.
They go up freely, and when they fall down they are blocked and prevent you from falling. The most famous representatives: various drops, shants, backups and asaps.
I also want to mention the various mini-clamps. They are capable of performing functions similar to large ones, although they are less reliable and convenient. Their undeniable advantage is their low weight and size.
As a result, one or two of these clips can always be kept on the harness. You can read more about them in the review.


In general terms, everything about the climb.
Now about the unpleasant, namely about breakdowns. And even more specifically about the jerk factor.
A newcomer entering any forum to discuss any hardware almost immediately sees this term.
Its essence is very simple to understand.
"Jerk Factor" is the ratio of the height of the fall to the length of the rope that stops it.
A rather rough indicator by which it is easy to determine whether a given piece of hardware will fall apart when jerked or not.
I strongly recommend avoiding falls with a factor greater than one.
It’s quite simple: if we secure ourselves to something (a quickdraw, a belay device on the second rope, etc.), the belay point should not be below the waist.
That's all. Thank you for your attention!
Rappelling is often called rappelling. Hans Dulfer is a German climber who invented one of the first methods of descent, proposed and put into practice at the beginning of the 20th century.
Descending along a fixed rope using a belay device and a catching knot.
If you need to go down the rope, use the following techniques.
Procedure:
Tie a gripping knot on the rope and attach it to the power ring of the system with a carabiner;
pull out a little rope through the gripping knot. The slack makes it easy to thread the rope into the belay device;
thread the rope into the belay device (according to the manufacturers' recommendations);
take back the slack in the rope through the belay device and load the system, the lanyard will no longer be loaded and it will be possible to snap it out of the station;
before descending, you must make sure that a knot is tied at the end of the rope (at least 1 meter from the end) or that it is secured to the lower station;
check the correctness of the system, release the lanyard and begin the descent;
you need to go down the rope smoothly, without jumps;
ATTENTION!
When loaded, the gripping unit should not rest against the belay device; the distance between the gripping unit and the belay device should be at least 10 cm.
During the descent, your feet should be kept shoulder-width apart, preferably at 90° to the slope, for a more stable position;
the upper hand holds the grasping knot; the lower hand controls the smooth release of the rope;
approaching the station, click a free lanyard into it;
loosen the rope: first release the belay device (it heats up during descent), then remove the gripping unit;
give a command to the participant above that the rope is free.
ATTENTION!
Avoid moving from side to side while descending. Horizontal vibrations of a loaded rope along the terrain are dangerous because it can get on sharp edges of the terrain and fray.
Descending using the UIAA knot with safety net
In the absence of a descender, the descent is carried out on the UIAA node with a safety net using a gripping node (which is located above the UIAA node at a distance so that it can be easily reached by hand).
Only coupling carabiners are used. Do not squeeze the gripping knot into your fist.

Multi-rope (multipitch) descent
When lowering a rope along an equipped route and when working with one rope - 40–50 m - the following techniques are used.
Procedure:
During descent, it is recommended to use a separate lanyard;
● the rope must be passed through the rappel rings or the station ring;
● divide the rope in half and, to avoid friction, pass it under the station;
● tie half-grapevine knots at the ends of the rope;
● throw the rope down or, dividing it into two equal coils and hanging it on a loop, give out the required minimum when descending;
● the first participant descends along a double rope on a descender with a safety knot;
● going down to the next station, organizes a new station;
● stands on the lanyard, gives himself a rope through the descender, leaving a free loop of 2 m (the necessary slack for the second participant to clip in);
● secures the rope to the station (for example, with a figure-of-eight knot through a carabiner) and disconnects the descender.
● gives a command that the rope is free;
● the participant at the top organizes a descent on a double rope with a catching knot;
● after snapping the grasping unit and the descender, he snaps out the lanyard, disassembles the station and descends to the lower participant;
● having descended to the station, stands on the lanyard, releases the ropes, unties the knots at the ends of the rope;
● both participants pull the rope and organize a new descent.

ATTENTION!
It is important to pay attention to ensure that the rope does not rub against the station slings and lanyards.
Knot for pulling rope
When organizing a descent with two ropes and then pulling them, especially if the terrain is very dissected and the knot can get stuck, a “simple” or “flat” knot is used. This knot passes kinks and dissected terrain better than all known knots.

ATTENTION!
The free ends of the ropes after tying a “simple” or “flat” knot must be at least 25–30 cm! Using a figure-eight knot in this configuration is dangerous because the figure-eight knot in this configuration unties at significantly lower loads than a flat knot. 
Lowering and pulling the rope:
The figure eight is usually the first descending device that climbers master; it is as simple as an ax and as reliable as a crowbar. In addition, the figure eight can be used both for insurance and as a ring, in general, whatever your imagination allows. Let's talk about her.
Now there are a huge variety of eights on the market, different in functionality, some of these triggers no longer look like “8”.
All eights can be divided into two groups, with and without horns. The horned eight is comfortable where you need to hang and free both hands, the hornless ones are simply lighter and are considered more athletic.

Modern versions of this descender also offer different ways of threading the rope into them for different speeds of descent and for show-off.

There is a variety of figure eights with a large rectangular hole, this is necessary to eliminate twisting of the rope during descent. It was precisely because of the strong twist that eights were prohibited for use by cavers during descent.
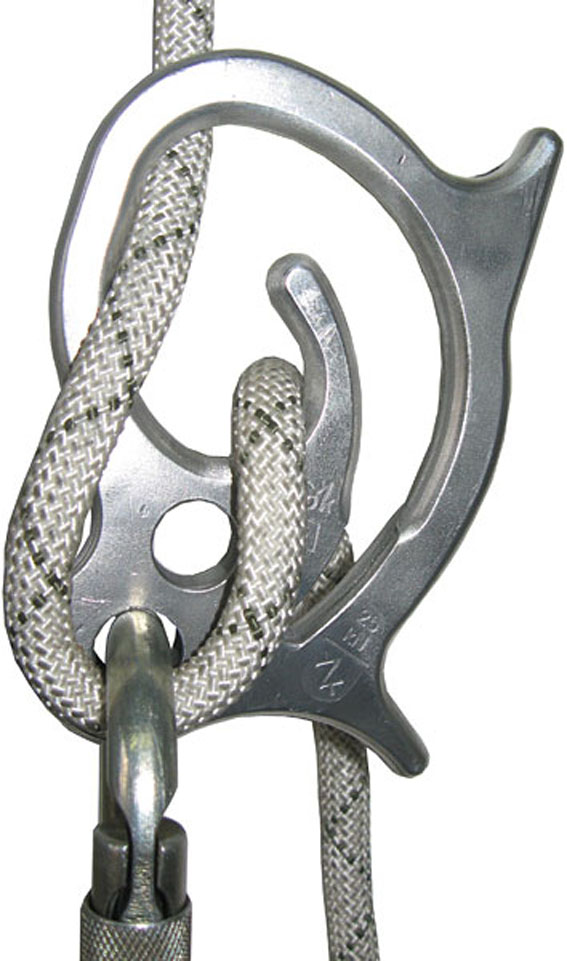
There is a variety called "Nine". It has a more advanced locking method, but it is not clear how to safely use it during descent. After all, to do this you need to loosen the free end of the rope going to your hand. How?? Only if you pull yourself up with one hand on a rope going up. If you know how to block it safely, write in the comments. But, in addition to the new blocking scheme, this “nine” also has classic horns, although they are short, they can be used. I think it will be well suited for industrial work where long hangs are needed.
There is a figure eight from Petzl with a special pad for gripping it with your hands when it gets hot. This is strange and incomprehensible. Let me explain, when descending, the figure eight heats up so much that it can burn your hand.. But for some reason the manufacturer didn’t think about the rope, but if it melts, then at best you’ll be hanging on the belay, and at worst, I think it’s clear.. Personally When descending, I control the heat, and if the figure eight is hot for my hand, then I slow down the pace a little.

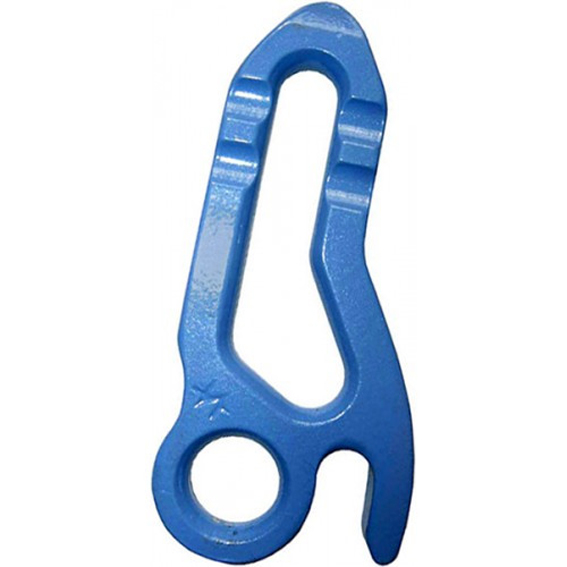
There is also an eight called "Petal", which is an interesting variety. It is very compact and has one horn and cutouts at the top for rope locking.
When it comes to rappelling, there are several ways to thread a figure eight rope.
First way– through the neck of the figure eight, without snapping the rope into the carabiner. With this method, the friction of the rope is higher, and therefore the speed of descent is lower. It is also easier to hold the free end of the rope. The downside is that to thread the rope this way, you need to unclip the figure eight from the carabiner.
Second way- through a carabiner and a larger hole in the figure eight, with this method the highest speed of descent and the least twist of the rope are achieved.

There is another way, but you should never use it. Look at the photo below. I repeat once again, do not use this method, I am talking about it only so that you know that it exists and that you cannot use it. This is life-threatening, you can simply lose the rope and continue almost free flight.

Other methods require non-standard figure eight configurations, and they are not particularly needed.
The best way of descent is the second one, it is the fastest, there is no risk of losing the figure eight and the twist of the rope is minimal.
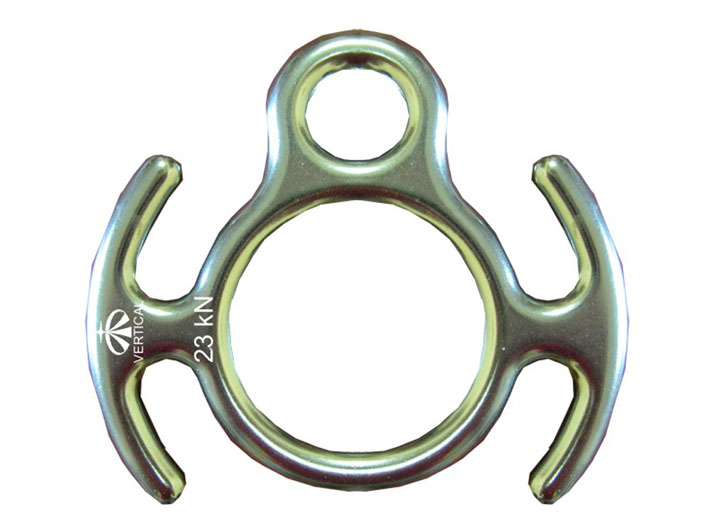
Separately, it is worth mentioning the use of figure eight horns. They come on two sides (this figure of eight is called “Invar”) and on one. Needed to block the rope in order to hang and free both hands. Many people simply wrap the free end of the rope around the horns, but this is also not safe. That's right - after winding, additionally throw the free end over the chassis, look at the photo.

Double horns can be used for blocking when rappelling on a double rope and for zigzag rappelling.
A zigzag descent is when two ropes, 1-2 meters apart from each other, are simultaneously passed through a figure of eight with double horns. When descending, one rope is blocked by a horn, and the other is released a little, then the ropes are changed. This method of descent can be useful for the ridge.
In addition to using the eight for its intended purpose, it also has other capabilities. For example, a figure eight can be used instead of a ring. If you click carabiners into it on both sides, then in some cases it can replace a quickdraw. Paired with a jumar, the figure eight can also be used for lifting. However, for lifting, it is better to replace it with some kind of grasping unit. It is the figure eight, due to the absence of moving and shock-sensitive parts on it, that is best attached to a rope instead of a load for throwing onto a branch or somewhere else. And of course, the figure eight is used to belay a partner, because if he falls, it will be quite easy to hold the rope.
As a rule, when we come to one or another equipment center, we are presented with a very limited selection of equipment, both mountaineering and rock climbing, for climbing or speleology. And all because only half of the branded goods that we have read a lot about or are used to using in everyday life come to us from Europe. This review proposes to consider the most rare and little-known brands of climbing equipment both in Russia, Ukraine and other countries of the former CIS.
Kong Futura Hand - Technical development Matteo Rivadossi (Italy)
New Futura Hand rope clamp- this is a fresh word in size, weight and technical characteristics. The weight of this device is 125g. The permissible load on these clamps is 470 kg. Recommended for ropes from 8 mm to 12.7 mm inclusive (but the most amazing thing is that it “stands dead” on 5.5 mm Beale dyneema! Fantastic!). Futura Hand is perfect for both classic movement along the railings in all-around tours, and for fans of high-speed caving climbs. In the kit you will find two interchangeable handles for different hand sizes.
P.S. The 100Kg crossed out symbol on this clamp is a standard CE marking indicating that this product is not certified for use as workmanship or rescue equipment!
Futura Hand locking is a new concept that requires less physical effort when moving the jumar along the rope. A special “cam clean” cam was installed with fundamentally new dirt removal channels (speleo), equipped with an anti-tipping system - i.e. does not require top locking with a carabiner. The wedges of the cloves are cut at a sharper angle. Used with the Futura Foot (similar to the Petzl pantine - a foot clamp) it becomes an integral part of the Futura System, which uses an alternating step technique in the lift. The difference between the Kong jumar and the petzel ASCENSIONa is that in the Hand there is no distinction between left and right, that is, it does not care which hand you use with it on the rope.
Unicender - created by the Anglo-American company Morgan&Thompson

Unicender- a device for climbing a rope, designed and implemented by the Anglo-American company Morgan&Thompson exclusively for foresters and arborists, but which has received its well-deserved approval and distribution also among speleologists (similar in operation to a descender), and kyoning specialists in the form of a self-resetting trolleys. Climbing a vertical rope is carried out by a person of average physical fitness solely with the help of his own hands. No jumars, pulleys, pedals, etc.!
In Russia and Ukraine this device is completely absent... what a pity! There would certainly be a use for it in industrial work!
LINEBOSS manufacturer - Get International (USA)
The LINEBOSS™ device is designed primarily for use in the DdRT (Double Rope Technique) technique for arborists and arborists, but its versatility and combination properties can be used in other rope schools.

LINEBOSS easily handles both climbing the rope (ascender), by pulling the latter, and descending (descender) down, after acting on the release handle, which unlocks the device. Can also be used as part of a positioning system at a workplace, or be tensioned as a linear belay for support movement.
Due to the extremely small bend of the rope in radii, there is practically no wear of the braid, which other types of descenders cannot boast of.
Rope diameter: 11 mm - 13 mm
Critical load: - 50 Kn (5000 kg)
Working load range: - 230 - 500 kg
Weight: 425 grams
CMC RESCUE MPD, developed by CMC Rescue Equipment, USA

This is a universal device specially created for a wide range of rescue operations, insurance and emergency descents in man-made conditions.
Can work like:
● Device for insuring large loads (up to 280 kg)
● Highly efficient roller with auto-locking function in pulleys of various multiplicities.
● Braking device for lowering a victim with one or two accompanying persons. It has a switching system from a lowering system (descent) to an ascending system (ascent).
● Can be used as a personal release device.
Other characteristics:
● The control system is designed to work with rope 12.5 mm - 13.0 mm
● Weight – 1100g.
●1983 NFPA Certified
AB Descender from SAR (England)

AB Descender meets two standards: EN12841-C as a Descender and EN341-C as a Descenders Rescue. These two standards have differences. Under the terms of the EN12841-C standard, the descender can use different types of ropes, in accordance with the user's SAR instructions. EN341 is a standard for certain rescue/exit systems and any system certified to this standard must only be used with the type of rope with which it has been certified.
Over the past ten years, the EN12841 standard has been adapted to meet user requirements.
Certain problems with other types of paratroopers, such as: sliding along the rope of the device when stopping, too much sensitivity of the control handle, at the slightest pinching of the handle, the “anti-panic” function is triggered, interfering with the descent, the inability to easily pull the rope up for some ascent, as well as the complicated design of some similar products. The designers of the AB Descender tried to overcome all these problems by adding simplicity to its design. The A-B Descender has received some useful design changes from users of the old SCARAB. A small spool has been added as a rope safety, and the main change is a larger folded lever in the handle when smoother control and less wrist strain are required when rappelling.
IMPORTANT(!): All parts of the device experience friction during descent, which creates a high internal temperature that can damage the rope if there is a fall or during a long, fast descent. Any of the above technical parameters are correct - when the product is new and operated in accordance with current standards.
The A-B Descender was tested by a registered body in a simulated rescue using a 210 kg mass as required in Standard 12841-C, clauses 4.4.5 and 4.4.9. It was also tested with 100 kg loaded on the descender and 100 k.
Toucan from Simond (France)

Does not twist the rope - an important quality for descenders. When falling, even with minimal friction against the wall, it eventually sits tightly on the rope, creating maximum friction, after which it practically stops the fall, but it’s better not to check this yourself. Toucan makes it very easy to insure with dynamic insurance. Weighs 100 grams, which is slightly more than the Reverso, but slightly less than a regular washer.
A small lever on the descender itself prevents the problem of the rope being pinched by the device.
The lever itself allows you to gently release the rope, or release the tension when using top and bottom belays. Designed for single and double ropes with a diameter of 7.5 to 11 mm.
Solo Aid SB2 by Rock Exotica (USA)

A device designed for bottom belaying and belaying during solo ascents. Safely grasping the rope when falling allows you to make the difficult process of solo ascents relatively reliable.
weight - 182 grams
breaking load - 22.7 KN
dia. ropes - 10-11 mm
CAMP Wing Traveling Pulley block roller for fast descents on inclined trolleys

Working load: 6 kN
Breaking load: 15 kN
Max. diameter: cable-12 mm, rope-13 mm
Pulley inner diameter: 26mm
Weight: 336g Original brake release
The unit's unique layout helps keep clothes and hair from getting into the work area
Wear-resistant bearings
Stainless steel with increased thermal conductivity
Maximum speed: 20 m/sec Mammut Smart
Self-locking belay device for single rope 8.9-10.5 mm. Automatic locking with top and bottom belay (similar to Click-Up, only cheaper). Weight 82 g.
Salewa nine (Austria-Italy)

A type of friction trigger devices - Salewa nine (Nine)
Diameter of working ropes - 9-11 mm
Kong DE JUMP manufacturer "KONG" Italy
 Kong DE JUMP is a descending device specially designed for canyoning. Equipped with a special mechanism for quickly releasing the device from the suspension system.
Weight: 328 g.
Material: Aluminum alloy/steel
Diameter of rope used: 9 – 12 mm
Robot (KONG, Italy)

The trigger device is universal. The original development of Kong, which is a hybrid of the classic figure eight and lattice (retran) and combines the advantages of both descenders: it does not twist the rope and is light weight. A large number of options for threading the rope.
Kong HYDROBOT (KONG, Italy)

A unique descender designed specifically for canyoning. Can be used with either one or two ropes. Allows you to effortlessly change the braking speed under load. Thanks to the special design, the risk of accidental loss of the device, twisting of the rope and wear of the carabiner is eliminated. If emergency lifting is necessary, Hydrobot can be used as a self-locking device.
Kong TRE (KONG, Italy)

This revolutionary belay device is as easy to use as a figure eight or washer, but unlike them, the TRE self-locks when jerking, allows you to work on both single and double ropes, and makes it much easier to clip the rope in and out of the device. TRE Perfect for belaying in rock climbing, canyoning, and industrial mountaineering.
Kong ORTIS (KONG, Italy)

Trigger controlled block. It is used with ropes and is intended for lowering a person from a height at a controlled speed (from 0.5 to 2 m/s).
Troll Pro ALLP Tech, manufactured by SAR (UK)

Weight: 585 grams
Tensile strength of the product: 20 KN
Working load: 270 kg
Slave/rope diameter: 10.5 mm - 12.7 mm
Can be used on semi-static and static ropes.
It has the ability to control the descent, both with a screw and a handle, or in a combined way. Allows you to adjust the trigger with one hand.
| Related articles: | |
|
In China they are looking for a cuddler for pandas. What conditions will the cuddler live in?
In China, due to the color of the coat and similarity in size to the red fox... The mystery of the disappearance of the “golden suitcase” Golden suitcase from the Kerch museum
At the beginning of 1925, a treasure was found in Crimea near Kerch. Peasant... Where to go to the sea in March?
We'll tell you where you can swim in the sea in March. We've compiled a list... | |


